Hi all from the sunny Spain.
Wouldn't you like receive mail art in your mailbox?
Start decorating your envelopes and send letters to your friends.
I've just sent this letter to one of my friends.
See how I did it. Hope you like it.
You can see more of my work on my blog
Thanks!, Cuchy

Showing posts with label Distress Inks. Show all posts
Showing posts with label Distress Inks. Show all posts
Sunday, 30 May 2010

Saturday, 6 February 2010
Circular Easel.
I really love easel cards and they are so easy to do. You can make them in all shapes and sizes, but it is easier when they are symmetrical.I keep being asked how ive done the scalloped flower edge and no it isnt a Spellbinder Die.
 2.Fold one of the circles in half towards the fold.This is going to be the Easel panel.
 3.The single circle which is going to be the face of the card, can be stuck to the panel ,though I actually prefer to decorate first and do this last,hence inking everything else up!! Which ever you prefer.
 4.For the scalloped edge punch out 3 0r 4 and cut in half, depending on how big your easel circle is going to be and ink the edges.
 5.Cut out a smaller circle(only about half an inch smaller than the circle front)and glue around the edges
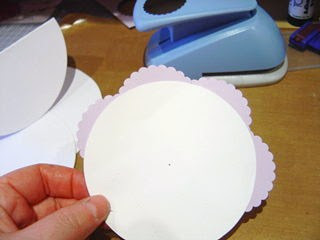 6.Glue onto larger circle and decorate to taste
 Hope that was easy enough for you to follow.There are more circular easels on my blog. Would love to see what you create.

1.To start with you need two circle cards.These are readily available now,if not they are easy to make. One is for the easel base and panel and the other needs to be cut in half as we only need half of it,which will make the front of the card. We also need a 2" scalloped circle punch
 2.Fold one of the circles in half towards the fold.This is going to be the Easel panel.
 3.The single circle which is going to be the face of the card, can be stuck to the panel ,though I actually prefer to decorate first and do this last,hence inking everything else up!! Which ever you prefer.
 4.For the scalloped edge punch out 3 0r 4 and cut in half, depending on how big your easel circle is going to be and ink the edges.
 5.Cut out a smaller circle(only about half an inch smaller than the circle front)and glue around the edges 6.Glue onto larger circle and decorate to taste
 Hope that was easy enough for you to follow.There are more circular easels on my blog. Would love to see what you create.
Thanks Debbie
Thursday, 4 February 2010
Paper flower tutorial
You will need:
Scissors
Pen
2 colours of ink
text stamp
piercing tool
stamen look a likes
1. Draw and cut 4 different size of circles

2. Stamp with text stamp all 4 circles. Use darker color here. Like this.

3. color all circles with lighter ink and sponge the edges


4. wrinkle all circles and open them


5. take darker ink and dab it on to the wrinkled paper


6. Pierce hole in the center of all 4 circles

7. Take those stamen look a likes and wrap them as shown
(or if you have different ones, try to do it a look a like)

8. Finally just string those circles through as shown

You have a beautiful finished flower

Have a nice crafting moments
Monday, 20 April 2009
APRIL IN PARIS
Who remembers the songs "April in Paris" and "I love Paris in the Springtime"?
I don't know why, but there just seems to be something especially exotic and romantic about Paris... particularly at this time of year. Paris, the City of Lovers...
So here's my take on it.
THE POSTCARD:

Paris Postcard
Copyright Susie Jefferson
1stFloorFlat
& BladeRubberBlog

Paris Tag
Copyright Susie Jefferson
1stFloorFlat
& BladeRubberBlog
If you'd like to know more about how to hand- tint your own photographs, click on this link to my Techniques page.
I don't know why, but there just seems to be something especially exotic and romantic about Paris... particularly at this time of year. Paris, the City of Lovers...
So here's my take on it.
THE POSTCARD:

Paris Postcard
Copyright Susie Jefferson
1stFloorFlat
& BladeRubberBlog
- The stamped background postoid text and the Eiffel Tower are both from Tim Holtz's I See Paris sheet.
- The postcard is a natural, flecked, handmade paper.
- The background was stamped in Ranger Archival ink in Sepia, and the Eiffel Tower in Brilliance Graphite Black onto white linen-effect cardstock.
- Tear round the Eiffel Tower image and colour it Direct-To-Paper style, using Versacolour pigment inks in Old Rose & Opera Pink, with a touch of Sky Blue.
- The image is from a photo in my private collection. If she isn't French, then she certainly looks it!
- Both Eiffel Tower and photo are layered over torn vintage French text from an old dictionary.
- I used a clear alphabet to stamp out April in Paris, using Ranger's Sepia archival ink again, and drew over the letters by hand with a red glitter pen. I also coloured in the lady's lipstick with the red glitter pen.
- Her cheeks were coloured with a cottonwool bud (carefully) with the Old Rose pigment ink.
- Finally, I drew over the lips with Ranger's Glossy Accents, to really make the lipstick "pop".

Paris Tag
Copyright Susie Jefferson
1stFloorFlat
& BladeRubberBlog
- Crumple a manilla tag then smooth it out again. Do this a couple of times.
- Swipe the tag with Distress ink in Mahogany and spritz a couple of times with clear water, so that the ink runs.
- Allow to dry naturally, or hurry it up with a heat gun.
- Flatten with an iron (on Dry setting) if you hate the creases.
- Stamp the Eiffel Tower in Ranger Archival Sepia ink and tear around the image.
- Use a cottonwool bud to tint the tower with a touch of Old Rose Versacolour ink.
- Scuff round the torn edges of the image with Distress ink in Black Soot.
- Stamp the alphabet as described above and draw over the letters with Glossy Accents.
- Tint cheeks & lips as above.
If you'd like to know more about how to hand- tint your own photographs, click on this link to my Techniques page.

Sunday, 23 November 2008
Fimo toadstool tutorial.
Hi all :)
I know there are many crafters out there who have spare Fimo polymer clay hanging around the craft room. A real easy little project is a Fimo toadstool, these can be used for displays, or as a great addition to a fairy garden for the kids. So i have done a basic tutorial with some pics to get you there.
First you need some Fimo, i used the Fimo Classic here....this was a light flesh colour, but any of the lighter colours will do.....

Cut off 1/4th of it, that's all you need for a toadstool of this size...
.
You now need to make two balls of equal size. To do this, just cut your piece in two before you start rolling the balls......cheers for that tip Maddy! :)

Then roll the two balls......one will be your stem, and the other your top.

Take the first ball, and roll it into a sausage shape.....

Then taking an end in each hand between the fingers, twist it alternating ways (one end forwards whilst the other twists backwards......apologies if that sounds like i'm teaching anyone to suck eggs, believe me when i say i need to make it clear so that I can remember it!!! :)
Now you have your twisted stem. You don't have to have a twist in it, in fact i'm not sure that real toadstools do at all.....i just like it!

So that's your stem done. Put it to one side and take your second ball of clay. Flatten it with the pad of your finger/thumb until it's quite flat, about 3 or 4 mm.

Now to mark the underside with the toadstools gills....i just marked a dot in the middle as a guide, then pressed with the blade of a craft knife to get the markings. Tip, if you find it hard spacing the lines out properly, mark a cross, then half the segments in that, then half the segments again......and so on. It doesn't have to be perfect though......have you ever seen a toadstool that was?

Turn it over, then for added effect, i cut small chips into the edge of the toadstool...

Next take the toadstool roof, and press the edges slightly to thin out the rounded edges. You can use two hands for this, one to hold, one to press. I just couldn't as i had to take a piccy!

That's the roof done......now push the stem up into the centre of the roof. Do this firmly enough to make it stick, but gentle enough not to go through the top. Hey presto....one Fimo toadstool!!!

Please do not fret if you think it looks rubbish at this stage, once it's gone hard and you have added some colour later, it looks so much better! Really brings out the realism to it.
Now go and stick it in the oven. I did mine for 30 mins at Gas Mark half, or 110 degrees F/240 degrees C. Once done, let it cool thoroughly.
Time to give it some colour. Below are the colours i used. A Dark Moss and charcoal Colourbox ink, and a Fired Brick and Tea Dye Distress ink pad. These were applied with a standard 1/2in paint brush i found in my shed. Oh yes...only the best tools for Calv! :)

First off, i applied the Dark Moss to the stem. I just jabbed the brush into the ink pad, then flicked the brush around the stem rather than "painted it. This ensured any little nooks and cranny's were coloured.

Then i turned it over and did the underside in Charcoal ink...

I just gave the edge a little ink too......

Lastly, colour the top. I used two layers of colour on this one, Tea Dye first then after a quick dry with a heat gun, i brushed it with Fired Brick to give it a reddish hint.
So there you go.......one finished toadstool!

The underside......

Thanks for taking a look at this, it is on my blog here too. It really is a simple piece to make, even my ten year old made one to this standard with only verbal input from me. I would love it if you could pass this method on to anyone who is new to Fimo, and if that someone was a little one, it would make it all the more special. :)
I know there are many crafters out there who have spare Fimo polymer clay hanging around the craft room. A real easy little project is a Fimo toadstool, these can be used for displays, or as a great addition to a fairy garden for the kids. So i have done a basic tutorial with some pics to get you there.
First you need some Fimo, i used the Fimo Classic here....this was a light flesh colour, but any of the lighter colours will do.....

Cut off 1/4th of it, that's all you need for a toadstool of this size...
.

You now need to make two balls of equal size. To do this, just cut your piece in two before you start rolling the balls......cheers for that tip Maddy! :)

Then roll the two balls......one will be your stem, and the other your top.

Take the first ball, and roll it into a sausage shape.....

Then taking an end in each hand between the fingers, twist it alternating ways (one end forwards whilst the other twists backwards......apologies if that sounds like i'm teaching anyone to suck eggs, believe me when i say i need to make it clear so that I can remember it!!! :)
Now you have your twisted stem. You don't have to have a twist in it, in fact i'm not sure that real toadstools do at all.....i just like it!

So that's your stem done. Put it to one side and take your second ball of clay. Flatten it with the pad of your finger/thumb until it's quite flat, about 3 or 4 mm.

Now to mark the underside with the toadstools gills....i just marked a dot in the middle as a guide, then pressed with the blade of a craft knife to get the markings. Tip, if you find it hard spacing the lines out properly, mark a cross, then half the segments in that, then half the segments again......and so on. It doesn't have to be perfect though......have you ever seen a toadstool that was?

Turn it over, then for added effect, i cut small chips into the edge of the toadstool...

Next take the toadstool roof, and press the edges slightly to thin out the rounded edges. You can use two hands for this, one to hold, one to press. I just couldn't as i had to take a piccy!

That's the roof done......now push the stem up into the centre of the roof. Do this firmly enough to make it stick, but gentle enough not to go through the top. Hey presto....one Fimo toadstool!!!

Please do not fret if you think it looks rubbish at this stage, once it's gone hard and you have added some colour later, it looks so much better! Really brings out the realism to it.
Now go and stick it in the oven. I did mine for 30 mins at Gas Mark half, or 110 degrees F/240 degrees C. Once done, let it cool thoroughly.
Time to give it some colour. Below are the colours i used. A Dark Moss and charcoal Colourbox ink, and a Fired Brick and Tea Dye Distress ink pad. These were applied with a standard 1/2in paint brush i found in my shed. Oh yes...only the best tools for Calv! :)

First off, i applied the Dark Moss to the stem. I just jabbed the brush into the ink pad, then flicked the brush around the stem rather than "painted it. This ensured any little nooks and cranny's were coloured.

Then i turned it over and did the underside in Charcoal ink...
I just gave the edge a little ink too......

Lastly, colour the top. I used two layers of colour on this one, Tea Dye first then after a quick dry with a heat gun, i brushed it with Fired Brick to give it a reddish hint.
So there you go.......one finished toadstool!

The underside......
Thanks for taking a look at this, it is on my blog here too. It really is a simple piece to make, even my ten year old made one to this standard with only verbal input from me. I would love it if you could pass this method on to anyone who is new to Fimo, and if that someone was a little one, it would make it all the more special. :)
Subscribe to:
Posts (Atom)