Sunday, 14 February 2010

Ribbon Flowers

Hello everyone. I'm really flattered to be able to contribute to Inspirational Tips and Techniques and so for my first contribution I'd like to show you how to make a folded ribbon flower.


So above, is the finished flower and now I'm sure that you all want to see how I made it.

First you will need to assemble your ingredients:

On my table I had:
4 strips of hot pink satin swiss dot ribbon each measuring 15 cm.
A few buttons. I hadn't yet decided which ones to use. You will need one bigger than the other though.
Cotton
A needle. Use a sharp one.
Start your flower by putting some glue on one end of the ribbon:

Fold it to the centre add glue to the other end and fold that to the centre too. Your ribbon should overlap and form a loop that the glue holds together in the centre.


Once you've done this you can layer up the pieces as seen in the picture below and now you're almost ready to sew them together.

I played around with the buttons that I had on the table and I finally chose a pink and a green button as I liked the way that they looked.


You need to be aware that you are sewing a lot of layers of ribbon together so that's why you will need a sharp needle. I started by sewing just two pieces together to get the position right.


Now layer up the pieces and sew together. Add your buttons and sew together and your flower is ready to go...

This and other tutorials are available on my Craft Fairy blog.

P.S. I take requests for tutorials.

Saturday, 13 February 2010

Salt Technique

Hi all, this is Cuchy.
I've prepared a video showing how I use the salt technique in my ATCs backgrounds.
The video is in spanish but I added some notes in english for you to a better understanding.
Hope you like it and find it useful.
You can see more tutorials on my blog, Hecho a mano

Thursday, 11 February 2010

Shadow Tutorial

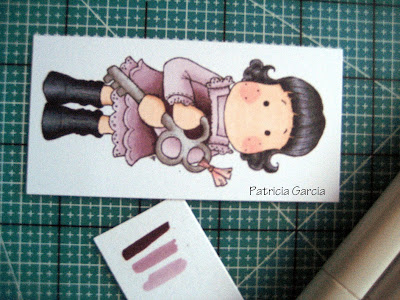
Patricia Garcia has gladly accepted to share with us this neat tutorial using Copics...  and here it goes:

Shadow Tutorial...


Today I have my first attempt to a shadow around the image tutorial, I have gotten several e-mails regarding how I do this technique so here it goes...

The first thing I do is completely finish coloring my image, once that is done I choose my main colors for my shadow in this case it was V99,V95,V91 and my colorless blender(I always like to test my colors on a scrap paper first)

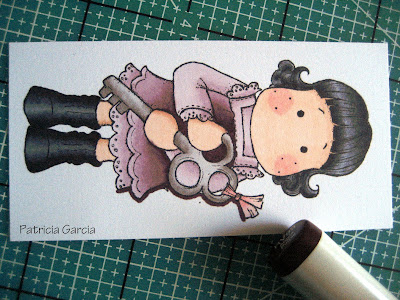
With my darkest color I outline my image not too much at a time that way my color doesn't dry (in this case I started with V99)

Then with my next darkest color I go over the out line of V99 blending a bit (in this case V95)

With my last color I go over both previous colors making my line a bit thicker (My last color was V91)

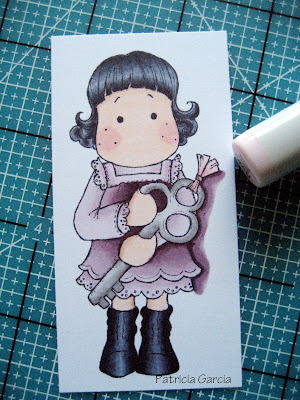
Finally I go over with with my colorless blender blending all 3 colors (This depends how much color you want to remove) evenly and acquiring the right shade, It's very easy and looks nice on the finished card. Thank You for your sweet comments and any questions feel free to ask, I really hope this Tutorial helped
 
******************************************************
For more of Patricia's wonderful work, click -->here.

Tuesday, 9 February 2010

These little doily envelopes are one of my favorite Valentine things to do for my husband and daughter. Over the years I've used them for wedding gifts, baby and wedding showers, put them on cards, scrapbook layouts and on one of my favorite projects my Valentine Window... Once you know the basics, you can make these envelopes with just about any kind of paper doily.... heart, square or circle. You can also go to my blog for a pdf to download with the instructions. I hope you enjoy making them and find some fun new ways to use these cute little doily envelopes...


By Michelle Baca
EverydayScrapbook.blogspot.com

Saturday, 6 February 2010

Circular Easel.

I really love easel cards and they are so easy to do. You can make them in all shapes and sizes, but it is easier when they are symmetrical.I keep being asked how ive done the scalloped flower edge and no it isnt a Spellbinder Die.


by Debbie Dolphin


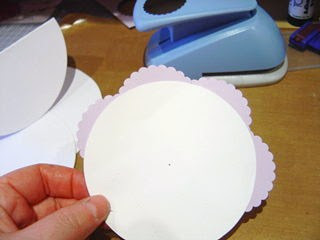
1.To start with you need two circle cards.These are readily available now,if not they are easy to make. One is for the easel base and panel and the other needs to be cut in half as we only need half of it,which will make the front of the card. We also need a 2" scalloped circle punch

2.Fold one of the circles in half towards the fold.This is going to be the Easel panel.


3.The single circle which is going to be the face of the card, can be stuck to the panel ,though I actually prefer to decorate first and do this last,hence inking everything else up!! Which ever you prefer.
4.For the scalloped edge punch out 3 0r 4 and cut in half, depending on how big your easel circle is going to be and ink the edges.
5.Cut out a smaller circle(only about half an inch smaller than the circle front)and glue around the edges
6.Glue onto larger circle and decorate to taste
Hope that was easy enough for you to follow.There are more circular easels on my blog. Would love to see what you create.

Thanks Debbie


Thursday, 4 February 2010

Paper flower tutorial

You will need:
Scissors
Pen
2 colours of ink
text stamp
piercing tool
stamen look a likes

1. Draw and cut 4 different size of circles
 
2.  Stamp with text stamp all 4 circles. Use darker color here. Like this.

3. color all circles with lighter ink and sponge the edges
 
  
4.  wrinkle all circles and open them

 
5. take darker ink and dab it on to the wrinkled paper

6. Pierce hole in the center of all 4 circles
  
7. Take those stamen look a likes and wrap them as shown 
(or if you have different ones, try to do it a look a like)

 
8. Finally just string those circles through as shown


You have a beautiful finished flower

Have a nice crafting moments

Monday, 25 January 2010

Punches Border Strip Flower Tutorial

Ilina Crouse is a creative stamper, cardmaker and scrapbooker... and has gladly accepted to share with us this *clever* tutorial. I just can't wait to give it a try! ;-D

**********************

Materials you will need:

12x1 strip of dsp (cardstock would work, but it's better with dsp)
sticky strip
1 3/8" punch
scallop trim punch (or any other border punch)
buttons late ( or other buttons or large brads)
linen thread
paper crimper
scrap cs to punch the circle

1. Punch your 12" x 1" dsp strip with the border punch, only on one side.2. Run it through the crimper 4-5 times, each time flattening the folds. Don't flatten them the last time you run the strip through the crimper.


3. Punch a 1 3/8" circle and cover it with sticky strip. I was out of sticky strip so I used artist tape from the art supply store.

4. Start adhering the strip around the circle making little pleats.


5. After you have finished one layer continue to the second one. My ends met at same point, so I didn't need to cut the strip. But you can finish where ever you would like and cut it there.


6. I used chocolate chip button and made a bow using the linen thread. Added a dimensional and adhered it to the middle of the flower. And there you have it. You can use it on a card, scrapbook page etc.