Wednesday, 2 July 2008

Another Fantastic Flower tutorial from Joanne


These flowers are simple to make, and don't take as long as the steps in the tutorial would imply!
It is important to make sure that the pieces are dry before attempting any shaping.

Supplies:
  • Plain white printer paper
  • Green card or paper
  • Punches - leaf, heart, 1/4" circle, stamen
  • Embossing mat (or similar spongy surface)
  • Sponge
  • Markers
  • Tweezers, Needle tool (or darning needle), embossing ball tool
  • Stickles
  • PVA glue


For each flower punch out four hearts, one 1/4" circle, and one stamen from the white paper, and one leaf from the green.


Put a small blob of pva glue on a scrap of paper, and touch the point of the heart to it to transfer a tiny bit of glue. Only a very tiny amount is needed.


Stick the four hearts to the circle as shown.


Sponge colour onto the outer edge of the heart petals. I used colour from my marker, and transfered it onto the sponge by wiping the brush nib repeatedly in a patch on the sponge. Set aside to dry.


Using the markers, colour the stamen shape as shown. Then add a touch of Stickles glitter glue on each rounded end. Set aside to dry.


Place the heart assembly face down on the embossing mat. Using the needle tool held flat on the mat, curl each curve of the heart top by making a sweeping motion from the edge towards the centre - a bit like spreading butter. Press gently into the mat at the same time. If it curls too much then use less pressure, too little then use more. Only do this just on the curved parts of the heart shape - not all the way in to the centre.


Turn the piece face up again, and using the ball embossing tool start at the base of one heart, and make a spiral going in towards the centre. At first use only very gentle pressure, and then get a little firmer as you get into the middle. The more you want the shape to cup, the more pressure you need. If it cups more than you want, then gently spread the petals back down with your fingers.


Use the embossing tool in the same way to cup the stamen shape. Don't use the tool over the ends with the glitter glue.


Put a tiny spot of glue in the centre of the heart assembly, and add the stamens. If you don't have a bottle with a fine applicator, then use a cocktail stick or toothpick to apply a spot.


Place the leaf onto the embossing mat, and use the needle tool to score vein lines. Hold the tool flat against the mat, and press and pull the point from the stem of the leaf towards the tip. Then draw the needle from the centre vein to the edges to create the side veins.


Turn the flower upside down and put a tiny blob of pva in the centre. Place the stem of the leaf in the blob of glue. Leave to dry.


Finished flower. I have added a touch of clear Stickles to the centre of the flower - still wet in the photo!


In the arrangement I made on the challenge card, I added a few extra leaves here and there to fill it out. It is not necessary to stick the leaf to the flower base if you find it more convenient for your arranging.

A note from Julie

Thank you to Joanne for another brilliant tutorial ~ you can find more of Joanne's lovely creations on her Mainly Flowers blog HERE

If you use Joanne's Tutorial to make your own flowers please leave a comment with a link to your creation so that we can come and admire xx

Monday, 30 June 2008

How to make labels for your craft

Transfer method

You will need

Label_tut_6


  • Word Processor/Graphic editor to design your logo


  • Strip of fabric ( I'm using ribbons for this tutorial)


  • Iron


  • 1 Sheet of Iron on transfers ( I've used Rymans)


  • Inkjet printer


  • Your creative head


Design your Logo

I use Corel Paint Shop Pro to design my logo. For this tutorial I've used Microsoft Word as most people have this word processor.


  1. For a step by step guide on creating your logo using Microsoft Word try this


  2. This is an important step for this method. Once you are happy with your logo, group your images together then flip your design to create a mirror image. Here's a step by step guide on how to group images


  3. To flip the images make a copy of your original image(now grouped). Highlight the copied image.On the drawing toolbar, click on draw, then click on rotate or flip then on flip horizontal. Here's a picture of my logos before and after I flipped it Label_tut_3_2


Print your Logo

  1. Highlight your flipped image and on the drop down menu click on copy.


  2. On the menu bar Click on Tools. On the drop down menu highlight Letters and Mailings. From the sub menu click on Envelopes and Labels. You should get something like this Label_tut_1_2


  3. Click on options and you will get this Label_tut_2


  4. From the label products menu choose a template. I've chosen the Avery Standard and 8460 address. Play around with this until you find a label that works for your design


  5. Click ok and it should take you back to the screen in step 2. Now click on New Document and a new screen will open. If there are no grid lines showing on the menu bar click on Table and on the drop down menu click on Show Gridlines


  6. Right click your mouse and an image of your logo should appear on the document. Move the image into the boxes. repeat this process until you have filled all the boxes.Play around with the position of the images and adjust the box height and width until you are happy with the positioning.You can make the image smaller or bigger by left clicking on the image and dragging any of the circles.


  7. Once you are happy, print your images directly on to the transfer sheet( Follow manufacturers instructions)


Transfer image to Fabric


  1. Cut your printed logos into strips like this Label_tut_7


  2. Iron the strips on to your chosen fabric (Follow manufacturers instructions)


  3. You should now have something like this Label_tut_4_2


  4. Cut to your required length. I've used a pinking scissors for a decorative edge.


sew your label on to your lovely craft or use fabric glue. I also use studs both to secure and to add an extra bling to my labels Label_tut_5


This is quick and easy once you've got the hang of it and the results can be really pretty. The disadvantage of this method is that it will wear off with time and you cant iron it once the image is transferred.


in part 2 there's a tutorial on how to make labels using another method. Hope you enjoyed this one. if you found it useful or you need me to explain any of the steps drop me a line.


Iron- on Adhesive method


You will need


Labels_part_2


  • Word Processor/Graphic editor to design your logo


  • fabric measuring 8 1/4" x 11 3/4" ( Size of A4 paper) I am using plain old cotton for mine


  • Iron- on Adhesive( I've used Therm o Web, Heat n Bond purchased from John Lewis Uk)


  • Iron


  • Inkjet Printer


  • Your creative head


Design your Logo


  1. Follow step 1 and 2 in this post to design your label but don't flip your finished image. Group your images together so you have one completed image


Prepare Fabric for printing


  1. Cut the iron- on adhesive thingy (Therm o web, Heat n Bond) to the same size as the fabric (A4 paper) and then follow the manufacturers instructions for bonding it to your fabric. ( Don't peel of the backing paper yet)


Tut_part_2


The one on the right is the iron adhesive cut to size ( It comes in the pack as one strip 17" x1.25 yards) Ps it doesn't usually arrive this ruffled I've ruffled it to show the difference as its the same colour as my fabric.


Part_2


and this is it ironed on and bonded.


Print your Logo


  1. Follow steps 1 - 6 under Print your logo in this post ( Ignore the bit about flipping your image)


  2. Put the bonded fabric in your printer and print your design. ( if your fabric is thick you may need to give it a bit of a helping hand )


Label_part_2_logo


This is what it looks like printed out.


I leave the backing paper on and cut the labels to the size and shape as needed.


Once you cut to the size and shape, peel of the backing paper and iron on to your bag/craft.( Follow manufacturers instructions) You can also sew it on.


Blog_logo


...and this is the label on my craft-y bag


Blog_bag


and the label belongs to this bag


This is the method I use for my labels. You can sew it, its washable and you can iron it. I suspect there's a lot more creativity to come out of it yet.


A bit about Therm o Web.


I think this is an American product. I did buy mine from John Lewis (UK) a while ago. I went back for more recently and they had sold out.


I've done a search on the web for UK based suppliers and so far have found this web site. Somewhere on the site it does say they are trade suppliers but I haven't checked it out yet.


If you do know of a shop either on line or bricks and mortar selling this product please let me know.

Hope you found this tutorial useful. If you did I'd love to hear from you.

Oge

x

A note from Julie :

Thank you Oge for a great tutorial

Please check out Oge's fantastic site HERE it is FAB!!

Saturday, 28 June 2008

Continuous Cuttlebug Embossing - Tutorial & card

After being asked many times how to create a continuous background using the Cuttlebug A2 folders I thought I would show you how I do it. One thing to bear in mind is that it will only work with repeated patterns, and word folders just won't cut the mustard with this technique


I started with a 14x14 cm tent fold card


Wrap the cuttle bug folder around the card, this card is a tent fold card so I am wrapping the folder with the closed edge of the folder at the bottom of the card.


Next run this though the Cuttlebug.


You can see that only part of the card is embossed


Next move the embossing folder across the card to emboss the other side matching up the dots by overlapping the folder over the already embossed dots.


Then run this through the Cuttlebug.


You can see from where the arrow is pointing that the folder has flattened some of the embossing, this is easily fixed as shown in the next step.


Match up the pattern by wrapping the folder around the card where you first started being careful to match up the embossed parts, this can be easily seen through the folder as it is transparent.
Once you have matched up the folder run your finger down on top of where the flattened embossing was, this will easily pop back up as it has already been embossed once.


as you can see no gaps can be seen


& there we have it, the finished card


A note from Julie
Wow Jak it's as if you know that I've just bought a cuttlebug!!
Thanks for another brilliant tutorial and for showing us your beautiful card
Everyone go and check out Jak's amazing blog HERE she is so talented!

Friday, 27 June 2008

Masterboard Tutorial

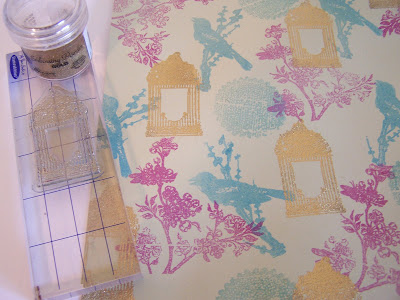
A masterboard is a canvas which is created -- through stamping in this case -- and can then be used to create cards, altered art or any number of other projects. Since I am looking for ways to create cards quickly and economically, this is my tutorial on how to make a masterboard that will work well for that purpose.


Here is the completed masterboard I created for this tutorial.


I am starting with an 8-1/2 x 11 sheet of River Rock cardstock by StampinUp. You can certainly adapt this to a 12 x 12 sheet as well.


The stamps I chose for this project are all clear stamps by Prima except for the quote which is by StampinUp.


My preference is to use stamps that represent a theme and therefore will mesh well together. I find on the size paper I am using smaller stamps work well. I like to pick out some that will branch out such as my flower, some that are smaller to fill in empty spots such as my little bird, and also a word or quote as I like text on my masterboards.


I also look at the stamps as I am picking them out asking myself how they'll look if a portion of them is cut off or if placed on an angle.


I start with my larger stamps. In this case the flowering branch will take up the most room so I place that radomly on my paper.


It's very important to remember to stamp off the page as you apply every stamp. This will give you the most use of your masterboard as you start to cut it up.


My bird is also a larger stamp so that is the one I apply next. Your masterboard will flow better if you start stamping over images right away. Connect your images to each other while still trying to cover up your space.


My next stamp is a circle of text although it's made to be blurred. I just thought at this point the masterboard needed a shape rather than an image.


So far I've chosen three complementary ink colors -- cranberry, turquoise and moss green. I see that my moss green ends up looking quite like the turquoise. May be because of my shade of cardstock. But I'm satisfied with the way it's coming along.


I usually like to add something that is embossed on my masterboard. It really helps set the piece off. Since I've used pigment inks up to this point, I have to make sure to heat set all my inks before I start embossing. If possible, it's a good idea to use dye inks up to the point you want to emboss an image. Too often I've found myself with a whole piece of paper that is attracting the embossing powder.


I decide to gold emboss my birdcage. I am filling in a lot of the empty spaces with this stamp as I know it's the last of the larger stamps I will use. I make sure even with this one to stamp off the page.


I then add my quote -- using only the top half of the stamp in this case. I stamp over images previously stamped.


My last step is to fill in any big blank areas with my little black bird. Since I'll be using every bit of this canvas for my cards, I don't want any blank space standing out.


At this point you can just use the original to make your cards or make a color copy and save the original. I've used my original here to make these quick cards -- because I know I'll be making another masterboard soon!

A note from Julie

Thank you so much for a fantastic tutorial Louise

Click HERE which will take you to Louise's brilliant 'Kard Krazy' blog

If you create your own masterboard using Louise's tutorial please leave a comment with a link to your creation :)

Wednesday, 25 June 2008

Anywhere Punches Decorative Accents

Here is a really, really easy technique that can look quite nice on the right card or scrapbook page. I recently used this on a card I had in a swap and one of the ladies who received it asked me how it was done so I thought I'd demonstrate it here.

For this technique you will need the following: anywhere hole punch with three or more sized hole punches, a hard surface to punch on, a hammer, a piece of cardstock and a constrasting piece of cardstock or paper, an adhesive eraser, a pencil and eraser, adhesive. You probably have an anywhere hole punch in your tool arsenal from the days when eyelets were all the rage and before there was the Cropadile. My set is from Making Memories and it came with three interchangeable heads in different sizes. You will also probably want to have a tool for poking out the pieces of paper that get into the punch heads. You can use a piercing tool if you have one.

On your cardstock you will need to draw some wavy lines or whatever design you would prefer. Make sure the lines are quite faint because you will want to erase them at the end. Then place your cardstock on a hard surface for punching.


Place your anywhere hole punch near the start of one of the lines. I usually like to start with the smallest punch and then go from there. Use your hammer to tap down hard on the punch and voila!


You have the first hole done.


Line up the hole punch along the line next to the first hole. Make sure they are one or two millimeters apart because the hole will spread slightly when it is punched and you don't want to punch into the existing hole.


Continue along in this manner, varying the size of the hole punch as you "trace over" the line you've drawn. The pattern you lay down is completely up to you - do whatever looks good to you. I tend to not use the same size punch for more than three holes in a row. As you go along remember to periodically clean out the heads of the hole punches or the paper will get compacted up inside them and will be difficult to remove.


When you are finished you will have "drawn" your lines with the hole punches, giving you a nice pattern to use on a card. When you have punched all the holes, you can go back over your pencil lines with an eraser to remove them.


You may be wondering why I don't draw the lines on the back of the card so I don't have to worry about erasing the pencil lines. While you can do this, I personally don't like the look of the punched holes from the back. They tend to bevel a bit and the back isn't as smooth in appearance as the front.


Adhere your punched cardstock over a contrasting piece of paper so the other cardstock shows through the holes and you're done! Some nice ways to use this technique are as stems for flowers or strings for balloons. You can also use it to write out words. You could use just one size of punch for a different look as well.


Here's a simple card I made using this technique.

Supplies: Paper (Bazzill, SU!, My Minds Eye), Ribbon (Offray), Stamps (SU!), Ink (Versa, SU!), Embossing Powder, anywhere hole punch.

A note from Julie

Brilliant Tutorial Lisa Thank you

Go and check out Lisa's Blog HERE to see other lovely creations

If you create something using Lisa's Tutorial please leave a comment with a link so that we can come and see :)

Monday, 23 June 2008

Double Accordion Album


DOUBLE ACCORDION ALBUM
by Vicki Hook

Supplies:
(4) 4” x 4” cardstock
(2) 3 3/4” x 9 3/4” cardstock
(2) 3 3/4” x 6 1/2” cardstock
(10) 3 1/4” x 2 1/2” cardstock OR tags, circles, etc.
(2) 4” square chipboard coasters
Scor-Pal
Bind-It-All & 5/8” O-wire
Adhesive, ribbon, stamps, ink, etc.

Directions:
1. Score both 9 ¾” long cardstocks at 3” and 6” using the Scor-Pal. Fold accordion style (mountain, valley, mountain)

2. Score both 6 1/2” long cardstocks at 1/2” and 3 1/2”. Fold accordion style.
3. Adhere the 1/2” sections of the step #2 cardstocks to the back of the 3” sections of step #1 cardstocks. (See the picture above how they overlap in the back.) You should now have two long accordion folded pieces that are 15 3/4” long. Each piece will have one end section that is longer than the other sections.
4. Cover the front and back of both coasters with the 4” x 4” cardstock pieces and adhesive.

5. Using the Bind-It-All, punch holes in one side of each coaster as well as the longer end section of each accordion folded piece.

6. Assemble the album with 5/8” O-wire. The longer end section of the accordion pieces will be next to the coasters and the folded parts will face each other in the middle. So this album will open in the middle and you pull the accordions out to the sides, one to the left and one to the right.


Tootles!

A note from Julie
Thank you Vicki this is great!! Go and check out Vicki's blog HERE folks and remember if you create your own accordion album using Vicki's tutorial please let us have a link so that we can come and admire x