This has also been called a "four-in-one card". Hope this tutorial inspires you to make your own!
NEVER ENDING CARD
Supplies:
4" x 10" piece of solid cardstock (I used Bazzill)
Scor-Pal
Adhesive
Paper trimmer or craft knife
Stamps (I used Always Remember from TAC)
Ink
Other flat embellishments (optional)
Scrap pieces of patterned paper (I used Angelee from TAC):
(4) 2 1/4" x 3/4"
(8) 2 1/4" x 1 3/4"
(8) 1" x 3/4"
(4) 1" x 1 3/4"
Directions:
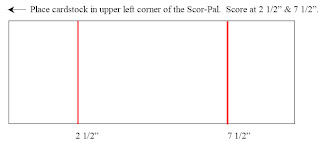 Step 1: (see red lines) Click to enlarge if you need to.
______________________________________________
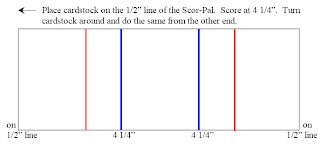 Step 2 (see blue lines) Click to enlarge if you need to.
______________________________________________
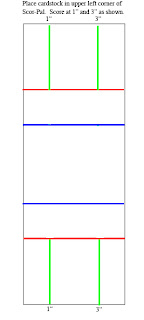 Step 3: (see green lines) Turn cardstock so the short side is at the top upper left corner of the Scor-Pal. Score at 1" and 3" from the top edge down to the first score line ONLY. Turn cardstock around and do the same thing at the other end.
______________________________________________
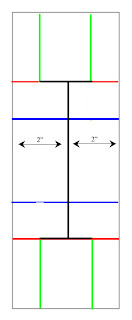 Step 4: (see black lines) Using a paper trimmer or craft knife, make a cut in the center (2" each side) from the 2 1/2" score line down to the 7 1/2" score line.
______________________________________________
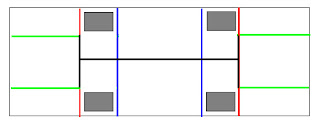 Step 5: Now cut on the 2 1/2" score line from the 1" line down to the 3" line. Do the same thing on the 7 1/2" score line.
Step 6: Place adhesive in the four places designated by gray shading in the diagram. Fold the left end up on the 2 1/2" score line, and the right end on the 7 1/2" score line, so they meet in the middle. They will be adhered to the back layer at four places.
______________________________________________
Step 7: Adhere scrap pieces of patterned paper in place. Stamp and embellish as desired.
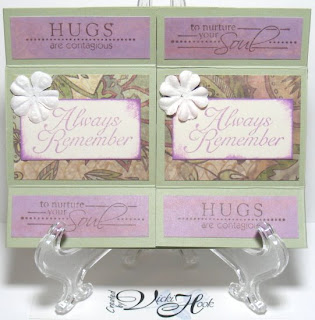
The picture above shows the beginning of card (gate-fold style).
Open and fold sides to the back to get the next view:
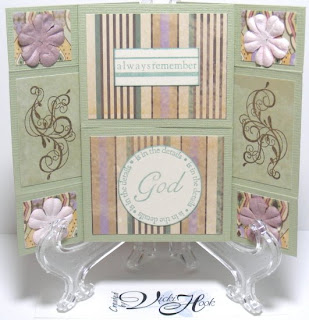
Now, flip top up and bottom down to get this view:
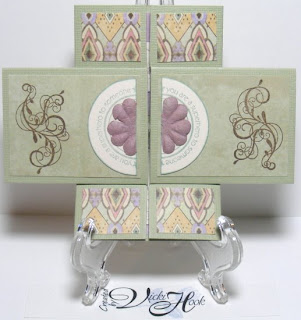
Next, open the sides and fold to the back again and you'll have the next view:
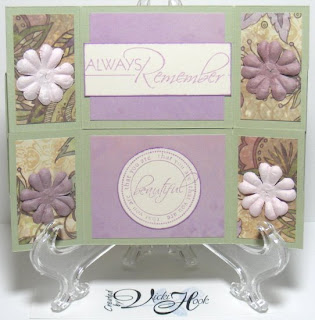
To go back to the beginning, flip the top up and bottom down. It "NEVER ENDS"!
Let me know if you make one! Have a great day, Tootles!

4 comments:
This is so cool. I've been looking for really clear directions and I have found them! I am going to try to make time to play with this tonight and if I do, I'll be sure to post. Is it okay if I link a post on my blog back here for others to use these brilliant directions?
I tried to make this card!
http://mojemiejsce13.blox.pl/2008/07/kartka-bez-konca.html
incredible...
I read and reread the tutorial, but I think I have to "do" it step by step...
I've seen it "move" on and on at the website of chwilka and it looks great..
It intrigues me... I'm tickled to try it ...
greetings
Inge from Belgium
This is amazing! I love this blog! I've had a go at my own never-ending card... :)
http://buttercupanddaisy.blogspot.com/2008/09/never-ending-card.html
Post a Comment