
 Here is the completed masterboard I created for this tutorial.
 I am starting with an 8-1/2 x 11 sheet of River Rock cardstock by StampinUp. You can certainly adapt this to a 12 x 12 sheet as well.

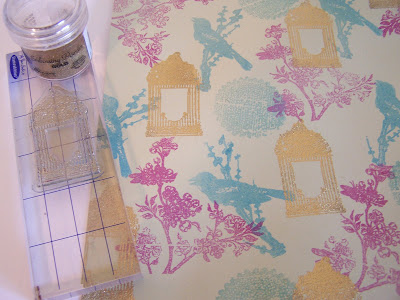
The stamps I chose for this project are all clear stamps by Prima except for the quote which is by StampinUp.
My preference is to use stamps that represent a theme and therefore will mesh well together. I find on the size paper I am using smaller stamps work well. I like to pick out some that will branch out such as my flower, some that are smaller to fill in empty spots such as my little bird, and also a word or quote as I like text on my masterboards.
I also look at the stamps as I am picking them out asking myself how they'll look if a portion of them is cut off or if placed on an angle.
 I start with my larger stamps. In this case the flowering branch will take up the most room so I place that radomly on my paper.

It's very important to remember to stamp off the page as you apply every stamp. This will give you the most use of your masterboard as you start to cut it up.

My bird is also a larger stamp so that is the one I apply next. Your masterboard will flow better if you start stamping over images right away. Connect your images to each other while still trying to cover up your space.

My next stamp is a circle of text although it's made to be blurred. I just thought at this point the masterboard needed a shape rather than an image.
So far I've chosen three complementary ink colors -- cranberry, turquoise and moss green. I see that my moss green ends up looking quite like the turquoise. May be because of my shade of cardstock. But I'm satisfied with the way it's coming along.
I usually like to add something that is embossed on my masterboard. It really helps set the piece off. Since I've used pigment inks up to this point, I have to make sure to heat set all my inks before I start embossing. If possible, it's a good idea to use dye inks up to the point you want to emboss an image. Too often I've found myself with a whole piece of paper that is attracting the embossing powder.
I decide to gold emboss my birdcage. I am filling in a lot of the empty spaces with this stamp as I know it's the last of the larger stamps I will use. I make sure even with this one to stamp off the page.

I then add my quote -- using only the top half of the stamp in this case. I stamp over images previously stamped.

My last step is to fill in any big blank areas with my little black bird. Since I'll be using every bit of this canvas for my cards, I don't want any blank space standing out.
 At this point you can just use the original to make your cards or make a color copy and save the original. I've used my original here to make these quick cards -- because I know I'll be making another masterboard soon!
A note from Julie
Thank you so much for a fantastic tutorial Louise
Click HERE which will take you to Louise's brilliant 'Kard Krazy' blog
If you create your own masterboard using Louise's tutorial please leave a comment with a link to your creation :)
7 comments:
what a great tute and those cards are lovely!
Sares xx
Wow! I'm so glad I found this blog!! great stuff!!!
Louise, thank you for this tutorial.
I have seen similar ones, but your's better because of all your little hints that make it easier for me to make a masterboard with my personal preferences.
Although I *love* your colour and style preferences ;-)
It´s a great tutorial Thank you Louise, I love the beautiful cards you made using your masterboard.
I made this... (my blog is in Swedish)
http://hobbyochhantverk.blogspot.com/2008/07/blog-post.html
[url=https://bisque.com/sc/members/lacita/default.aspx]no scrit tramadol
[/url]
[url=https://bisque.com/sc/members/tibito/default.aspx]buy dreampharmaceuticals from online tramadol
[/url]
[url=https://bisque.com/sc/members/fofefi/default.aspx]tramadol knife online
[/url]
[url=https://bisque.com/sc/members/hayuva/default.aspx]tramadol apo tr50
[/url]
[url=https://bisque.com/sc/members/lacita/default.aspx]tramadol 37.5
[/url]
[url=https://bisque.com/sc/members/tibito/default.aspx]tramadol po box
[/url]
[url=https://bisque.com/sc/members/fofefi/default.aspx]buy prescription tramadol without tramadol online
[/url]
[url=https://bisque.com/sc/members/hayuva/default.aspx]experiences of tramadol
[/url]
[url=http://gerpiska.cz.cc/chanel-knock-off-designer-handbag.html] [/url]
"I may sit down, mayn't I." he asked.
"That's chanel knock off designer handbag not usual," the supervisor answered.
Grubach was his landlady chanel knock off designer handbag - but today she didn't come.
The supervisor may chanel knock off designer handbag have agreed with him, at least K.
The others chanel knock off designer handbag had also come closer.
"As soon as he wants chanel knock off designer handbag to see you.
Not before," said the policeman, the one called Willem.
[url=http://gerpiska.cz.cc/chanel-knock-off-designer-handbag.html] Chanel knock off designer handbag. [/url]
Post a Comment