
Friday, 20 February 2009

Princess Carriage

What do you think? I am absolutely loving how this little pretty turned out and I bet my niece who I made it for will love it too!!
Requirements –

Twidleybits pre-cut wood Carriage kit
Basic grey Patterned papers or assorted patterned papers to suit
Various paints and embellishments

To create –
Using the wooden pieces as templates trace each onto the back of patterned paper and cut out.
Adhere the patterned pieces to each of the sections. I also chose to cut pieces to fit each of the large floral shapes on either side of the carriage.
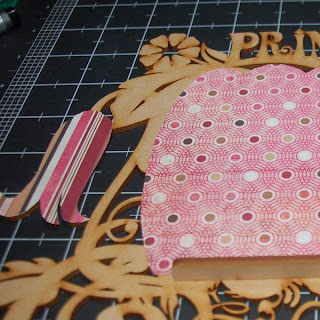
Use a piece of sandpaper or an emery board to smooth out fit of the patterned paper to the edges of your shapes. This will also help the patterned paper to blend into the shape as if it was always meant to be there.
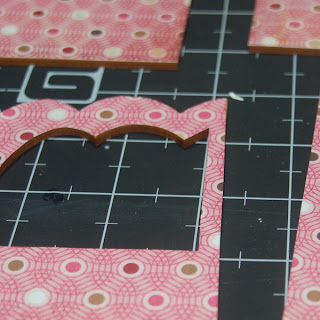
Ink all your edges to hide any imperfections and to add greater contrast.
To complete my frame I painted each surface with the appropriate colour (eg green for the swirls and leaves and pink for the flowers). Once dry I dry brushed a pearlescent paint over the surface of the green to provide a means of tricking the eye into believing there was numerous layers of shading. Finally I added blended shades of pink to the flowers and the word princess before coating with a light glitter paint.
To decorate my frame I chose to add some large Tim Holtz chipboard hinges to the front section then painted them with a gold leaf paint. The inside pages I have only added a few embellishments so that I have plenty of room to add my photo’s.

Monday, 16 February 2009

Striped Background

I went through my bookmarked "ideas" links and can't find the person's blog where I first saw this background. I'm soooo sorry! I know the technique isn't new, but I liked the way she used it.

Anyway, here's mine:

I used Palette L'Amore Red ink, a sponge, white cardstock, a piece of scrap paper (I grabbed a piece of vellum I had left over), and I also used graph paper although you don't have to.

If you don't have graph paper, just measure and mark light pencil lines at each end of your cardstock so you know where to lay the scrap paper. Sponge ink over the edge of the scrap paper, then move the scrap paper down to the next line you want to ink and sponge again.


Here's a close-up view of how I used the graph paper as a guide.


Here's how I used my striped background on a Valentine's Day card. The stamp set is "Forever" by The Angel Company. I also used a Martha Stewart lace border punch.

Check out my Angel Stamper 2 blog sometime, Tootles!


How To Quill A Simple Flower

Spring is just around the corner! Here's a simple quilled flower to embellish any card, scrapbook or craft project.
On the Scribd box click on the top right for a full size view. You can now email or print the tutorial for yourself or your friends!

How to Quill Flowers
Take a peek at my blog here for more quilling tutorials. Thanks!

How To Quill Teardrop Hearts!


I know Valentine's Day has come and gone but I thought you might enjoy these hearts for any project!
On the top right of the Scribd box, hit the button for a full size view. You can now email or print for yourself or your friends!

How to Quill Double Hearts

Saturday, 14 February 2009

Nugget Purse

I came across Karen's 2 pack Nugget Purse, but again - who am I to leave well enough alone, LOL! I made it bigger to hold three nuggets. Who can stop at just two?! (ok, let's be honest - who can stop at THREE, LOL!)

I used double-sided cardstock by K&Co. cut to 4" x 4 1/2".

With the 4 1/2" side across the top of the Scor-pal, score at 1", 1 1/2", 3", and 3 1/2".

Turn cardstock so the 4" side is across the top. Score at 1/2" and 3 1/2".

As shown in the picture above, cut and remove the 1/2" side sections from the 3" score line to the 4 1/2" end. Also, round the two corners on the end and add red-lined tape (or a good glue) where shown in the picture.


Cut a 7" piece of ribbon (no wider than 1/2") and place it on the inside of the box with the red-lined tape. The picture above gives better details.


Now adhere the sides together with the remaining two pieces of red-lined tape, placing the tiny tabs on the inside of the box.


The top flap will tuck down inside the "purse".


Embellish as desired. I left it pretty simple and just added a ribbon and bow with more red-lined tape.


Here's a close-up of how I did the "faux bow".

Come visit me sometime at Angel Stamper 2!

Enjoy your weekend, Tootles!

Friday, 13 February 2009

Making an Organisational "How to" book

I have to admit that I really do enjoy creating different things to make my life easier and I also enjoy sharing them with others. It takes me no time at all to write up a how to (so long as its not report writing time that is lol) and I like the idea of helping others to create. My newest article is another how to on making this -


To do book

You need –

  • 1 A4 sheet chipboard cut in half

  • Patterned paper

  • Embellishments

  • Printout copies of template

  • Ribbon Binding rings or binding comb


Directions –


Print out approximately 20 copies of the template below. Cut sheet in half and trim to size. Ensure the pages fit within the your cover (an A4 sheet of chipboard cut in half). Cut your patterned paper to the same size as your covers.

1

Cover both sides of the front and back pieces with patterned paper. Sand the edges to smooth.

2

Ink the edges of the covers, both inside and outside.

3

Use a binder or hole punch to punch binding holes along the left side of the cover and the inner pages of your book. I actually used my bind it all to punch a set of six holes along the top and bottom of my left edge.

4

Insert a binding comb or if you like the effect I went for then add a 1 inch binding ring to each of the holes.

5

To complete my book I tied a piece of ribbon to two of the rings, binding 2 at a time together. I then decorated the cover of my book with a variety of embellishments.


Monday, 9 February 2009

Tea Bag Mini Album

Hello papercrafters! Here's something different I've been wanting to try...a teabag mini album. I was inspired by one I saw a few years ago in the Stampington, I believe, magazine. Anyhow it was quite simple to make:


-Take 4 herbal tea bags. Make a small slit on each bag and empty the tea inside. (Leaves a nice fragrance.) Set aside for now.
-Cut 8 pieces of patterned paper, 2-1/4"x 2-1/8". These will be your album pages.
-Machine stitch a border on each piece of paper.

-Stamp and embellish each piece of paper.
-Adhere the 8 decorated pages on top of the 4 teabags (front and back, of course) using paper glue.
-Sew or machine-stitch the 4 decorated tea bags together to form the album.
-To form tabs, staple a piece of ribbon to the edge of each of the last 3 pages.
TIP: I then embellished the ribbon tabs with the small flowers I found at the bottom of my patterned paper, you know, the "color-code" strip. Just punch them out with a 1/2" circle punch. See picture below to see what I'm referring to:


TIP: to cover the staples used to adhere the ribbon tab, I just adhered a paper flower or embellishment on top of the staple. See picture below. I don't know if I like the "stapled" look yet.

To complete my Tea Bag Mini Album, I will fill it up with my favorite pictures!