Saturday, 10 April 2010

Pretty Vintage Paper Flower Posies.....

By: Colleen ~HappyLittleArt~

Hi Everybody!!! I'm very excited to post here for the first time!!!

I'd like to show you how to make these vintage paper flower posies...


I'm sure you've seen these paper posies around but I wanted to show you how I make them! While they take a little time to create, they are so worth the effort!!

To start...get your supplies ready, you'll need: Glitter and a color spray in a complementary color, scallop punch, vintage paper or print, glue, brads, flower centers and leaves....after that...you're ready to go...

Start by punching out lots of scallops circles....you can use, sheet music, children's stories, dictionary pages...anything really...

Then spray your paper to give it a little color and sparkle and wait until dry!

Then put glue on the edges....I pierce mine and do several at a time....and spoon your yummy glitter over the glue!

Here is another look at the glue all glittered up....pretty huh?!

Then, stack 5 or more of your glittered circles on top of each other and stick a brad in the center....almost done.....

Now crumple each layer towards the center where the brad is...do each layer individually....

Finally, add your decorative centers and leaves, if you want them...and viola...pretty paper posies for your projects!! You can make them in different colors to match your project too!! Fun, Fun, Fun!

Here is a completed flower on my card....

I hope you like my first ever tutorial! Thanks for taking a peek! For a complete list of supplies that I used, you can hop over to my BLOG or just stop by to say Hi!
Have a great day!!
Hugs,

~HappyLittleArt~

Wednesday, 7 April 2010

A Tent Card Tutorial

By Debbie Dolphin
Really you can use any size squares, but here I have used two 6x6'' and a 4x6''.
Using a scoreboard score the 4x6 every inch as shown. This will create the bottom of the card.
For the front panel I used my largest blossom nestie die to make the aperture,then cut again with a smaller blossom die.This is then to hang with a jump ring like so.
Carefully adhere to the previously prefolded card as in the picture to the front panel.I find it best to use doublesided tape for this. Then repeat for the back panel.
When both bottoms are attached to the prefolded base ,then attach at the top and it should look something like this.
I actually find it easier to decorate before I attach it together.
If you would like to see how I decorated mine and the stamps and inks I used please visit my BLOG.
Thankyou
by
Debbie Dolphin

Part 2 of tutorial: Promarkers on shrink plastic

Here is the second part of a 2 part tutorial I recently posted on my blog  and on Passion for Promarkers weekend workshop
You can find part 1 of this tutorial here
Digital image on Shrink plastic and coloured with Promarkers.

1. I have also printed the image directly on to Shrink plastic. Be careful when handling this though as the ink stays wet.

2. Colour in the image taking care not to touch the print as it will smudge. Your colouring with Promarkers doesn't have to be good here! Don't use very dark colours as the colours you use intensify when the image is shrunk. Punch a hole in the Shrink plastic if you wish to attach it to your project with a brad or to thread ribbon through.
3. Finally shrink it with a Heat gun. You now have a small "tile" to attach to your project

Love sarah XXX

Tuesday, 30 March 2010

Sunday, 28 March 2010

A Butterfly Easel Tutorial

by Debbie Dolphin
Hello
I keep being asked how I made my Butterfly easel card,so I thought here would be a great place to do so.
Firstly you need a butterfly template. Draw one on a single white card and then draw another on a pre-folded card like in the picture. Note that the top of the wings are slighty hanging over the fold as this is where he card will open.

Carefully cut out and fold in half like the picture below.This is going to be the easel panel which will hold the main butterfly which we decorate.
The single butterfly will then be attached to the easel panel, but only at the bottom half. Personally, I prefer to decorate it first then attach it to the panel
.
Then it should look something like this.


and decorate with papers,rubber stamps,flowers etc.


Here for the paper flowers I punched out three different sized blossom flowers,scrunched up and added embellishments for the centres.Then I distressed the edges used Victorian Velvet distress inks.

To see more easel cards please visit my BLOG

By Debbie
It would be lovely to read your comments
Thanks xx


Wednesday, 24 March 2010

2 Step bird rose bud.


You'll need: 2 way glue pen, red and green card stock, 2 step bird punch, post it notes.


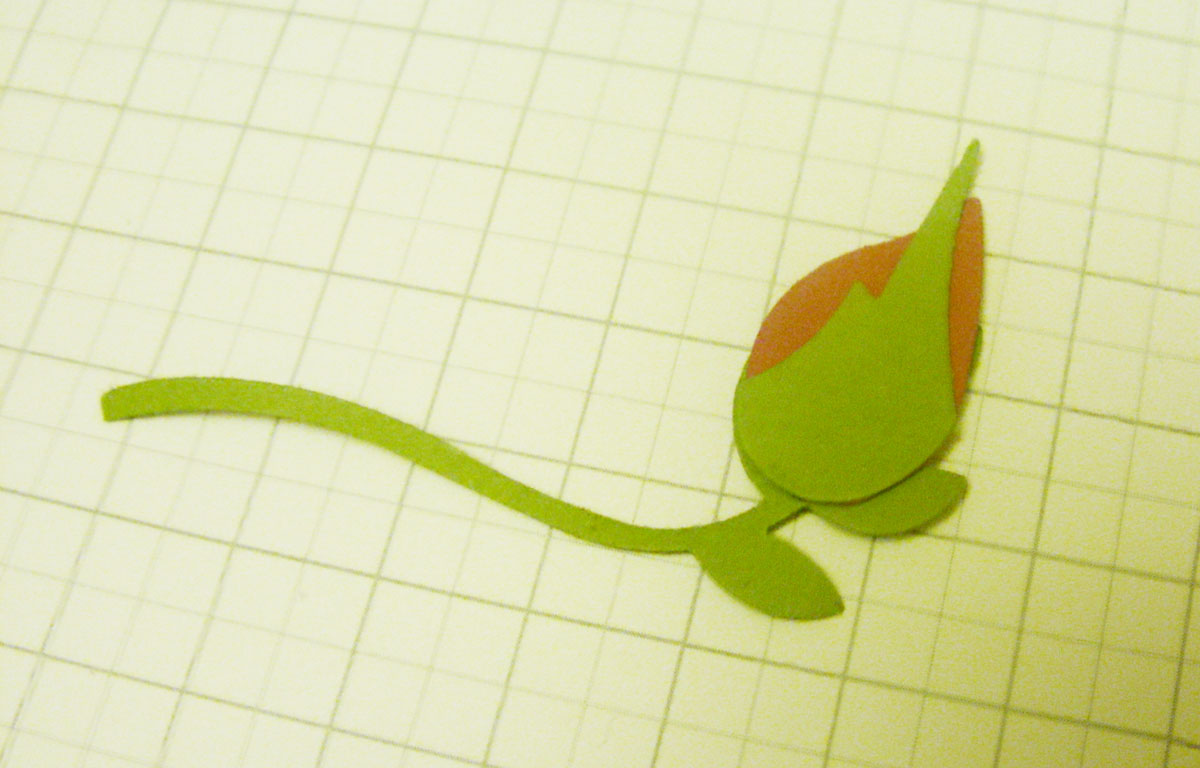
You'll need to punch one whole punch in green and also one wing shape in red,


Using a post it note attach the green bird to the sticky edge so it makes it easier for you to slide the bird back into the punch,


slide the tail of the bird into the wing shape of the punch, you might like to lift the very tip of the tail out of the punch so you don't cut it off then use the punch to create a bud shape,


you'll be needing these three pieces that you have punched, the red wing the green branch and the green tail piece,


Using your 2 way glue pen stick the green tail on top of the red wing then layer this onto your green branch, now you have a tiny rose bud!

These roses look gorgeous if you use a sponge dauber to add some depth around the edges of the punched pieces. 

Thanks for checking out my tutorial,

you can see more of my tutorials and work here on my blog

Abi

Friday, 19 March 2010

Decoupage using a Digital image

Decoupage is still very popular and can be done easily with rubber stamps. You can also decoupage with Digital images. This tutorial will show you how to do it easily.
The image I have used is Whimsical Girl Heart Garden from Bee Crafty.
 

This is part 1 of a 2 part tutorial ( both parts can be done on their own though)

1. First I printed the image 4 times using Photo Printing Wizard onto good quality white cardstock ( about 250 gsm)


2. I then coloured one image with my Promarkers. My 2 main colours are Mango and Bright Green. This isn't necessary as this is the base image which will be layered but I think it gives a more professional look.

3. I then cut out the image, in this case  using a Nestability die.

4. I have then coloured and cut out various parts of the  image from the remaining 3 images.

5. Here is a close up of the cut out images.

6. If you don't have many Promarkers and want to use shading on your images you can go over your colouring with the same colour to deepen it. In this case I have gone over the Mango with the same Mango pen on the left side of the image. I have done the same with the Bright Green. This will give the shaded effect

7. I have layered the pieces on top of each other with foam pads.

8. Next I have used Glossy accents over the heart shape flowers and sprinkled tiny yellow accent beads. The Glossy accents is clear and will act as a glue to hold the beads in place.


And there you have a decoupaged image made from a digital image.

I would love to read any comments you may have
Love Sarah XXX
you can see more of my work here sarahwrightdesigns.blogspot.com