The birdies (and owls) are the flavour of the month in scrapbooking at the moment as we follow the trends in fashion and interior design.I have used the Upsy Daisy Designs papers titled "TWEET" for my altered project and layout.
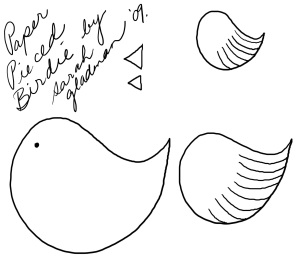
Step One:Draw three tear drop shapes onto spare card and cut these out as "templates".OR click HERE

for my own template of this birdie to appear.
Simply print it out and you will then have a template ready for this project.Place this template down on your chosen paper and cut out the shapes, then ink softly all around the edges of each shape.
Step Two:Once you have inked all the edges, Cut into the bottom portion of each wing several strips in order to make it look like feathers. Adhere the larger tear drop shapes wing to the main body of the birdie.
Step Three:Apply mounting tape or squares to the underside of the smaller tear drop shaped wing and adhere over the top of the first tear drop shapes wing.Use the end of a pencil or paintbrush as a means of curling the wingtip feathers.
Step Four:Cut two small triangles out of scrap card and ink the edges. Adhere to the underside of the bird's face, each triangle slightly overlapping each other.Add an eye by either drawing a dot on the bird or attaching a jewel.
Voila! One completed birdie.Have fun and happy scrapping girls!
Sares x
PS: Visit my Blog Leonardo's Apprentice for heaps of other Tips and Techniques to use in your scrapping!
Sares x
PS: Visit my Blog Leonardo's Apprentice for heaps of other Tips and Techniques to use in your scrapping!


8 comments:
Thank you so much for the lovely tutorial!
Great tutorial and sweet bird - hope he'll bring spring soon :)
Awe, he's beautiful.
Thank You for a great tutorial.
Gez. xx
cute bird! :)
Martha
Thats really effective. Thanks for sharing x
Oh, I love this cute little birdie. Gonna make one tonight.
Thanks for sharing!
great idea, thanks, ikki
I left an award for you on my blog to thanks you for all the lovely inspiration you gove us:)Marja
Post a Comment