
I really love easel cards and they are so easy to do. You can make them in all shapes and sizes, but it is easier when they are symmetrical.I keep being asked how ive done the scalloped flower edge and no it isnt a Spellbinder Die.
 2.Fold one of the circles in half towards the fold.This is going to be the Easel panel.
 3.The single circle which is going to be the face of the card, can be stuck to the panel ,though I actually prefer to decorate first and do this last,hence inking everything else up!! Which ever you prefer.
 4.For the scalloped edge punch out 3 0r 4 and cut in half, depending on how big your easel circle is going to be and ink the edges.
 5.Cut out a smaller circle(only about half an inch smaller than the circle front)and glue around the edges
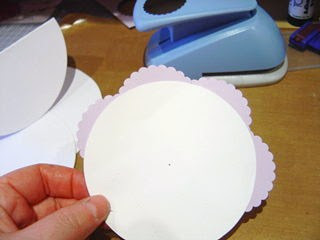 6.Glue onto larger circle and decorate to taste
 Hope that was easy enough for you to follow.There are more circular easels on my blog. Would love to see what you create.

1.To start with you need two circle cards.These are readily available now,if not they are easy to make. One is for the easel base and panel and the other needs to be cut in half as we only need half of it,which will make the front of the card. We also need a 2" scalloped circle punch
 2.Fold one of the circles in half towards the fold.This is going to be the Easel panel.
 3.The single circle which is going to be the face of the card, can be stuck to the panel ,though I actually prefer to decorate first and do this last,hence inking everything else up!! Which ever you prefer.
 4.For the scalloped edge punch out 3 0r 4 and cut in half, depending on how big your easel circle is going to be and ink the edges.
 5.Cut out a smaller circle(only about half an inch smaller than the circle front)and glue around the edges 6.Glue onto larger circle and decorate to taste
 Hope that was easy enough for you to follow.There are more circular easels on my blog. Would love to see what you create.
Thanks Debbie


