
 You will need the shocking pink 23mm wide grosgrain for this and I used the swiss dot one as I wanted to have the contrast between the plain side and the dotty side. You can make a plain one if you want to but this looks kind of cute.
You will need to start by rolling a short section of the ribbon and securing it with a couple of stitches. Stitching is better than gluing as it will held in place and then, if you want to put it on a garment you can wash it without being afraid that it will fall apart. This roll will be your bud.
 Next fold the ribbon at a 90 degree angle to the roll as shown below.
 Roll the ribbon around the central bud until you get to the end of the folded part. It will be obvious when you do it. Secure the bottom with a couple of stitches. ,
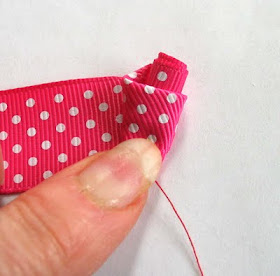
 Fold and roll again and again. See below. Make sure to put in a couple of stitches as you go.Below is what your rose should look like after you have folded a few times.
 Now look at the back and you will see how this is coming along, and where to put the stitching.
 Basically you keep on going until you have as many petals as you want. The cut you r ribbon and tuck the raw wdge under and tack into place. Turn over and your ribbon is done.
Wow! These are fab, definitely going to give them a go.
ReplyDeletevery pretty rose, like the dots!!!
ReplyDeletePaula
very cute!! I´ll feature on my blog. Hope you don´t mind.
ReplyDeletehugs from Brazil
Just a quick note to let you know that a link to this post will be placed on CraftCrave today [08 May 01:00am GMT]. Thanks, Maria
ReplyDeleteWhat a great Tutorial - your pictures make it so easy to see!!
ReplyDeleteHugs, Antonella
P.S. this is too funny: this is the same way we make folded roses with paper!!! I should send people to you for the instructions :-)
What a great idea to use ribbon for these roses. Thanks for the tutorial.
ReplyDeleteWonderful! Thanks for sharing! :-)
ReplyDeleteIt´s beautiful.Thanks for the tutorial
ReplyDeleteWow...i can do that!!!!
ReplyDeleteThaks for tutorial
Hugs
Four thumbs up for your blog,
ReplyDeletetwo from my hands and the other two from my feet. I love it. I learn many things here. I can use this in my school project. More power to you and thanks!
Thank you!
ReplyDeleteGracias por compartir el tutorial de las flores.
ReplyDeletejust come accross your Blog what fantastic projects I'll be visiting again! Thankyou x
ReplyDeletei tuoi lavori sono molto interessanti e istruttivi ,grazie per dato la possibilita' di vederli ,passa da me www.metalfimo2.blogspot.com
ReplyDeleteThank you so much for this post. I want to let you know that I posted a link to your blog in Creative Busy Bee Craft Inspirations, under the Page 4 post on Aug. 12, 2012. Thanks again.
ReplyDelete