
Now this is just a quick plain card to show you the colouring i have used ...
I have been itching to show you this ! but needed a little practice myself first !
I can't say im great at colouring in - i struggle with blending and light and shade , i think most people can relate to that at some point !
Whilst trying to get a different look to my colouring , i started experimenting and came up with this ... now my friends at craft club have seen these colouring comparisons and they said there was a big difference in depth and vibrancy .
Theres also a special little tool you use to get the effect as well - more about that later !
So im gonna show you a few comparisons first ...
here are some images i had started to colour.....

here we have whisper pens on the left and prismas on the right
although i try to imitate the whisper colouring with the prismas - there is still a slight difference.
now then ... look at this one .
.

you can see the difference and ive only been practicing a few times with this .
How did i do it ?
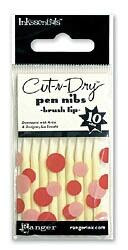
Well i started off with a great little find ..... these little beauties !These are an absolute must and my special tool !

cut and dry pens nibs - these where brilliant for this AND also just for blending in tricky areas that are too small to blend with paper stumps and prismas. You still need paper stumps for large areas - but i wouldnt do without these now .. You get 10 in a pack - but you can sharpen the other end , then snip it to a point , which means its really 20 your getting. They last alot longer than paper stumps and theres no having to file to a point everytime. A little snip after many colourings would bring the point back.
First start as you normally would with you prismas.

draw heavily around the outline of the image and shade alittle in the middle lightly.
2. blend in the colour with a paper stump and sansador.Use small circular movements with the stump.

3. Next take a darker shade and go around the outline again and also where it would be shaded..
This time use the Pen Nibs , it is much more precise .

Now the special part !
Take your whisper pen ( pic 1) - chose a slightly darker shade than the prisma colour.
outline a small part , this is important - only do small areas at a time and work quickly
dip your cut and dry nib into sansador , and spread the whisper colour this time with strokes AND circular movements - sliding the ink away from the edge - the ink should sort of slide on the card. (pic 2) This is because you have used prismas and sansador first.
dont colour or go into the the lighter parts of the image.

Pic 2.

Do this again - building the depth up deeper with this layer and dipping the pen nib in sansodor - dont rub card as this will make it too wet.
TIP .. If colouring with blue - rub some red onto a piece of plastic ( or acrylic block) and lift off the colour with the blue whisper pen - add that to the final outline and shading to jeans and wow if gives it a beautiful violet blue overtone !
So after your third layer of dark blue , take your white prisma pencil, and lighten all the parts that catch the light now because the vibrancy is strong with whispers colouring the white really does show up well.

continue in this manner until all the image is coloured .

Now i am going to show you how i made the little decorative brads in the middle of the flower stamps on the card.

In the middle of the flower there is a brad in fimo.
Right ... first thing is to roll two small balls of fimo and flattern with the pad of your finger
.

Next roll two smaller white balls of fimo and again flatten each one
.

Place ontop of the larger flattened balls .
Using a straw , push into the middle and twist out, do the same with the other end of the straw on the next flatterned ball. This will be your hole for the brad.

bake in the oven as per instructions on the packet ( very important to have right temperature !)
When baked push a brad into the middle .
next i stamped a mini stitchels flower stamp and cut the image out .coloured the image and then i outlined the image with a white pen -
I cut some flourishes from some paper and outline this with white pen again . I attached the brad and fimo to the flower image and then attached to the flourish.

Now throughout this tutorial - i was interupted by something with pink ears ... to find out please take a visit to my blog ...It also has the supplier of pen nibs and fimo .
madimaginations

oh, my goodness. You are an answer to a prayer!! I have been wanting to learn how to do this for a while now. I have researched every where and although my coloring has improved I have not reached it yet!! I will definitely have to try your technique!! thanks so much for sharing!!! WOW again!!! :)
ReplyDeleteWOW!
ReplyDeleteFantastic Tutorial!!
Thanks Maddy xx