You may like to refer to these entries if you haven't seen them before -
No Tools Flower and
Tool SubstitutesIt is important to let all colouring and gluing dry thoroughly before attempting any shaping. Wet paper will not take shaping well, and will not hold the shaping afterwards.
As usual - click on any picture for a larger view.
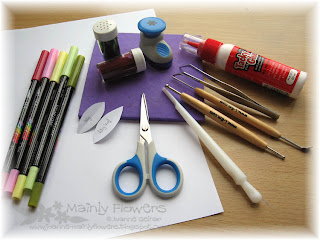
Here's the list of items needed to make the lily:
- Piece of white printer paper
- Moulding mat
- White pva glue
- Tweezers - not essential, but useful
- DEET tool
- Embossing ball tool
- Character shaper
- Scissors
- Coloured brush tip markers - or whatever colouring medium you prefer - paints or watercolour pencils & brush etc
- Flocking - see tutorial for substitutes
- Small six petaled flower punch, or snowflake - needs six points.
- Petal and leaf templates - see below
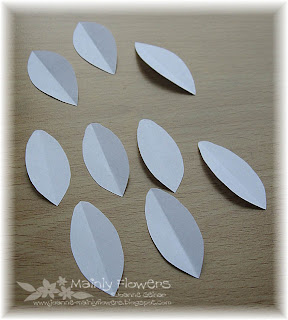
Cut two strips from the length of the piece of printer paper - about 3cm or just over an inch or so is fine. Fold them in half down the length, and use the templates to cut out six petals and three leaves. You can either design your own templates or use the ones I will be posting shortly. The leaves are about 5cm x 2cm at the widest point (2" x 7/8"), and the petals are about 4.75cm x 1.75cm (scant 1 3/4" x 3/4").
Please refer to the
No Tools Flower instructions for exactly how to cut the petals and leaves.

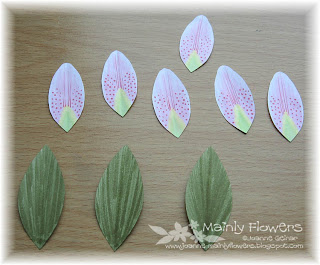
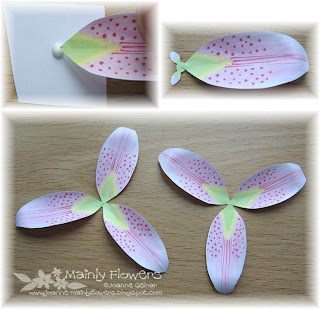
Three leaves at the top, and six petals at the bottom - notice that the petals are more rounded at one end - this will be the outer tip of the petal.
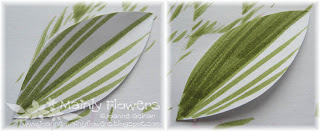
Making sure that you colour at the inner, pointed end of the petal, use a light, bright green to create a triangular shape as shown. I started with the top, middle of the triangle, and brushed a line downwards with the marker to the point. Then I worked outwards on each side, each time drawing a shorter line. If you enlarge the picture you can see the staggered outline this gives. The edges of the triangle need to be like this and not straight.
Then brush in lines of yellow around the edge of the green. I used the same direction and working order as with the green, so that I finished with the yellow going slightly into the green.
Next use a pale pink marker - this time brushing from the edge of the yellow up towards the outer tip of the petal. Leave some white around the outer edges. A natural, uneven finish is what you are aiming for.

Now turn the petal over, and brush on the pink the same as on the front. I prefer not to go over the base where the green and yellow is on the other side as the pink will soak through and spoil it. The white spot will not show once the lily is mounted on a card. The pale pink needs to be fairly dry before applying the darker pink otherwise the colours will bleed.
Turn the petal back to the front and, using the fine nibbed end of a dark pink marker draw in lines as shown. Draw with a quick, flicking motion from the top of the yellow to the tip of the petal. Do one long line on each side of the centre crease, and two or three shorter ones randomly placed.
Use the brush end of the dark pink to make randomly placed spots as shown.

When making the spots, hold the marker completely upright as shown, and touch the very tip with very light pressure to the paper. If you vary the pressure slightly, you will get a variety of sizes of dots. You can use the fine nibbed end depending on your marker. I find that mine gives too tiny a size dot, and I can't vary the size of them.

Use a nice leafy green brush marker to colour the leaves. Start with a line down the centre, and then draw lines fanning out as shown. Now go back and fill in between the lines as with the left half of the right hand leaf below. Just work with single strokes always going from the base of the leaf towards the tip. Make quite quick movements with light pressure. Some areas will get covered more than once, and this gives the variation in depth of colour. If you colour too much, the paper will get too wet.
Here are the finished petals and leaves. Make sure that they are completely dry before doing any shaping on them. The leaves in this picture are still wet - the lines in the colour will become less pronounced once they are dry.
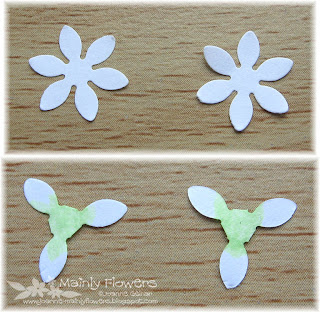
Punch out two six petaled flowers, or snowflakes. If you don't have any six armed shapes, then use a small circle as per the
No Tools Flower - it will need to be nice and small so that it doesn't show too much in the finished flower.
Cut off every other petal on each flower, and colour the centres in the same green as used on the petals. No need to colour the backs.
Curve the petals as per the
No Tools Flower instructions.

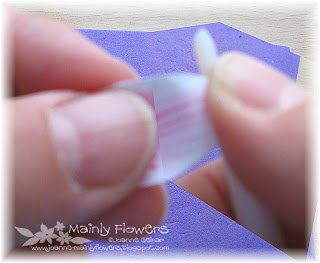
My apologies for the lack of focus in this picture. It also looks a little weird, as I spliced two photos together to show you how to hold the petal and tool to do the next part. (Had to do the splicing as I misplaced my third hand today!)
Hold the petal by the base, with your thumb in the curve and a finger on each side underneath to hold the curve around your thumb. This will prevent the curve flattening out whilst shaping the tip. Use the 'sharp' edge of the character tool with the rounded part facing towards the base of the petal, or the edge of your scissor blade. Sandwich the petal between the edge and your thumb just as you would if you were curling ribbon. Gently work around the tip of the petal to make it curve downwards.
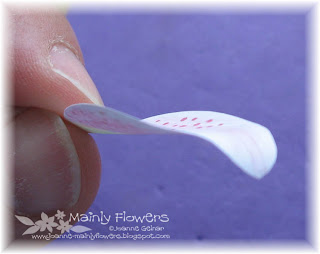
The finished shaping of the petal should look something like this.
Put a small spot of pva on a scrap of paper. Touch the base tip of the petal to the glue, and then stick the petal on one of the flower arms, with the point of the petal in the centre of the flower - click for a better view.
Glue on the rest of the petals as shown.
Place a pinhead size spot of glue in the middle of one of the layers, and place the other one on top. Alternate the petals, and once you are satisfied with your arrangement, press in the centre with the ball tool to adhere firmly. The pva will give you a few moments time to adjust the positioning.

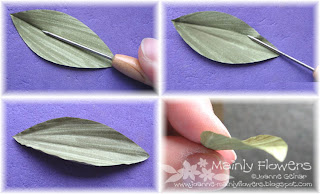
Place a leaf on the moulding mat, and using the needle end of the DEET tool, make a crease down the centre by placing the needle as flat as possible on the leaf, and drawing it with slight pressure down the length of the leaf from base to tip. Now do the same in a slight curve to one side of the centre. Repeat on the other side, and one or two times more on each side. The leaf will automatically curl up as in the bottom left picture below. Then curve the tip a little, as you did with the petal so that it looks like the picture at bottom right.
Cut a rectangle of paper approx 4 x 2.5cm long (1.5 x 1"). Cut a fringe down the length of it as shown. The width of the fringed pieces needs to be only about 1.5mm (1/16th"), and you need 7 of them. Leave about a cm (1/2") uncut at the bottom.
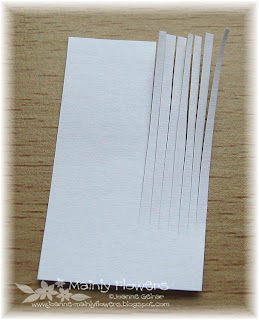
Now cut off the portion as shown, and colour with the light green all over the solid part, and the tips and bases of the fringed parts. Do this on both sides.

Starting at the fringed end (which is the end with my watermark over it in the picture above),roll the paper up tightly around the needle end of the DEET tool, or a quilling needle if you have one. Place a spot of glue at the end of the tab before you finish rolling to secure it.

Snip off some of the rolled end so that you have about 3mm (1/8") left. (It's easier to snip off the excess now, than to work with such a small strip when rolling.) Now hold the stamens in the centre of your flower to test their length. If they seem too long to you, snip off a little from the fringed end, until you are happy with them. Mine are a little shorter than the length of the petals.
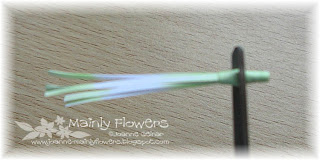
Gently spread the stamens out, and place a small bit of glue on each of the tips. Put it on both sides as shown so that it makes a little round blob at the end. Dip the glued ends into the flocking. I have used a deep pink for six of them, and green on the one that seemed to be most in the middle. If you don't have flocking, then liquid pearls or similar works well - use that instead of the glue - this is what I have used on the
fuchsia I made the other day. Looks pretty good - just not fluffy. If you don't have anything, then you can just colour both sides of the tips with a marker.
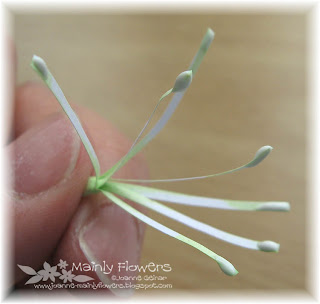
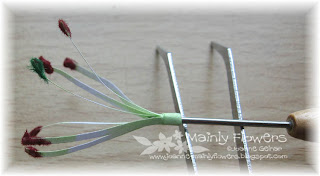
Support the stamens and leave them to dry. I have put them back on the needle of the DEET, supported by my tweezers for the photo. Putting them on the end of a cocktail stick, standing in a small jar works well - but I was too lazy to go get them!
Use your embossing ball tool to draw tiny circles with gentle pressure in the centre of the lily to make the petals pop up. How much to make them pop up depends on how full blown you want your lily to be.

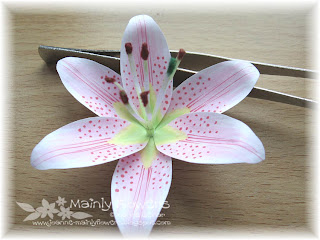
Put a blob of pva the same diameter as the base of your stamens in the centre of the flower. Using tweezers to grip the stamens at their base, stand them upright in the glue. Hold for a few seconds until the glue is starting to grip.

Make sure the stamens stay upright when you let go, and prop up the lily whilst they dry completely. Once they are dry, you can make adjustments to how the stamens are positioned to suit your preference. If they are too spread apart for your liking, then gently hold each one with the tweezers at the base, and run the tweezers up towards the tip to curve them in the direction you want. If you do this before the glue is set hard, you will just pull the stamen assembly out of the flower. Not that I am speaking from experience at all!
A note from Julie :~ WOW Another fantastic tutorial from Joanne !!
You can visit Joanne's Mainly Flowers Blog HERE
Remember everyone if you create something using this tutorial leave a comment on this post so we can come and see :)